

What Are Smart Filters In Photoshop
The ultimate guide to Photoshop filters
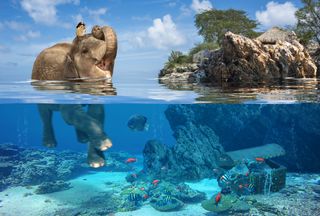
You tin can do annihilation with Photoshop filters. Need some fog or rain in the horizon of your photograph? There's a filter for that. Need to refocus your composition? There'south a filter for that, too. There are even filters for making the sky await painted, your trompe l'oeil compositions look realistic, and the elephant in your photo wait similar he's having a bully time splashing around.
- The 40 best Photoshop plugins
The beauty of filters is that they enable yous to beginning from scratch and create an effect tailor-fabricated for the composition you're creating. Stock art imagery can only be so useful when it comes to creating compositions, and while it might take you an hour or so to detect the perfect water texture, for example, it will simply have a fraction of the fourth dimension to complete the event with the Plastic Wrap filter. It'due south the same with so much of the Filter menu; it can give you terminal adjustments, sure, but more often than not, it can provide you with something to piece of work with, such equally clouds or a lens flare, then that you can blend information technology into your work. (For non-Photoshop filtering options, see our best VSCO filters.)
Don't believe us that you can practice annihilation with filters? Just read this Photoshop tutorial to detect what's possible…
01. Motion Blur

Move Mistiness, unsurprisingly, creates impressive realistic motion effects. Define the area first, and then apply the filter. Controlling the angle and the distance is essential to achieving the best results.
02. Plastic Wrap

The Plastic Wrap filter is perfect for creating liquid effects. To give you much more control over the consequence, select small areas on the image, and then adjust the settings.
03. Displacement Map

When yous're working with textures, the Deportation Map is very handy for creating subtle distortions. Only you tin also create beautiful water reflections using only this filter.
04. Render Flame

Rendering flames in Photoshop is very easy. First, create a simple path using the Pen tool, so go to Filter> Render > Flame. Select the Flame Blazon and adjust the Advanced settings.
05. Liquify

Liquify requires some practice. Vary the brush size continually, keeping the pressure low, and so gently stroke to apply the filter. Apply the Smooth tool (E) to refine the effect.
06. Return Clouds

Create a blank layer and use a Motion Blur filter to add move. Mask away areas with a soft brush to reveal details from the groundwork. Adapt the Blend If blending option, pulling one-half of the black slider in (property opt/alt) under This Layer.
07. Surface Blur

Surface Mistiness tin can exist a great alternative to Gaussian Mistiness because it retains edge item. This makes it suitable for smoothing out facial skin. Mask out areas to restore detail.
08. Reduce Noise

When you beginning enlarging, filtering, or sharpening rasters, you might accumulate some noise. To reduce, apply Reduce Racket on individual layers, or apply to a merged layer to affect overall.
09. High Laissez passer

Use High Pass for a unlike take on sharpening. Merge layers, catechumen to a Smart Object (Photoshop/CC), set to Overlay or Soft Light, and then apply High Pass (try Radius: vi).
10. Field Blur

Build up your own mistiness mix! With Field Mistiness, you can easily add multiple blur points, each with its own blur force. The final consequence factors in all the points.
11. Radial Blur

When you've placed the image of the stars in the background, duplicate (cmd/ctrl+J), gear up to Screen and go to Filter > Blur > Radial Blur for this absurd effect.
12. Oil Pigment

The Oil Pigment filter (Filter > Stylize > Oil Paint) is a corking mode to give a cartoonesque finish to the background.
13. Displace

Save your work as a PSD, insert a stock image of a crack over the statue and go to Filter > Misconstrue> Readapt. Cull 10x10 for the Scale, cheque Stretch To Fit and Wrap Around and choose the PSD y'all've just saved.
14. Return Tree

Stick to one or two tree types and apply to individual layers. Alter Co-operative Height and Arrangement sliders for each, resize using Complimentary Transform, and suit each one using clipped Curves adjustments.
15. Gaussian Blur

Use the Gaussian Blur filter every bit a Smart Filter and add just plenty to soften the large groundwork copse (6-eight Radius). Lower the blur for the closer trees. Apply the blur to the background layer too, and mask out the midground details for depth of field.
16. Add Noise

Fill a new layer in white. Go to Filter > Noise> Add Racket to create some noise on this layer and utilise Levels (cmd/ctrl+50) to alter the contrast of information technology.
17. Dry Brush

Become to Filter > Filter Gallery > Dry Castor. This volition convert your noise more than into splodges; go to Filter > Blur > Movement Blur to make it await like pelting. Set to Screen.
eighteen. Glowing Edges

Once you've created your neon text, using layer styles such as Outer Glow and a Pen-drawn cable backside the messages, merge all into a stamp layer and go to Filter > Filter Gallery > Stylize > Glowing Edges.
xix. Spherize

Apply the Spherize filter to wrap images and text around a sphere. Grab the Elliptical Marquee Tool, concur Shift and create a selection. Apply the filter to create the baloney.
20. Lens Flare

Fill a new layer with black, changing the blend to Screen. Use the Lens Flare. Add a Gradient Map adjustment layer (clip the layers). Change the slope colours to apace create a beautiful dusk.
This article originally appeared in Photoshop Creative. Buy dorsum issues here .
Related manufactures:
- ten best VSCO filters to stand up out on Instagram
- 14 Photoshop aligning tools to retouch your images
- 45 best photo apps and photo editing software
Related articles

What Are Smart Filters In Photoshop,
Source: https://www.creativebloq.com/features/the-ultimate-guide-to-photoshop-filters
Posted by: bradleypand1956.blogspot.com
0 Response to "What Are Smart Filters In Photoshop"
Post a Comment